https://www.pixelcut.ai/projects/280c19e4-7759-4aa6-8633-6c40af6ccc73/editor/
Create AI Videos
Download after effects free
https://www.pixelcut.ai/projects/280c19e4-7759-4aa6-8633-6c40af6ccc73/editor/
Create AI Videos
Download after effects free
Each module can have a global and area-specific di.xml
file. The application reads all the di.xml
configuration files declared in the system and merges them all together by appending all nodes.
As a general rule, the area specific di.xml
files should configure dependencies for the presentation layer, and your module's global di.xml
file should configure the remaining dependencies.
The application loads the configuration in the following stages:
app/etc/di.xml
)<moduleDir>/etc/di.xml
)<moduleDir>/etc/<area>/di.xml
)The areas are:
During bootstrapping, each application entry point loads the appropriate di.xml
files for the requested area.
Constructor arguments
https://webkul.com/blog/how-to-create-your-own-theme-in-hyva-theme/
https://github.com/alpinejs/alpine/tree/v2.8.2#readme
An alpinejs is a lightweight javascript framework that contains same kind of data binding that we love in other js frameworks. Hyvä Themes uses only alpine js as its single js dependency.
Hyvä Theme uses the TailwindCSS framework that is very easy to customize, responsive, and fits on all devices. It creates a very small size of CSS stylesheets which reduces the amount of data your site visitor has to download.
Tailwind is a utility-based CSS framework that you don’t typically write the CSS classes yourself, instead, you can use the classes that are present within Tailwind.
First install this chrome plugin to better view knocout js of a website
https://chromewebstore.google.com/detail/knockout-context-hover/lcpnkclcbpmhekkjnkomhoecoiobbejf?hl=en
https://chromewebstore.google.com/detail/knockoutjs-context-debugg/plomponkmimcpdlpekioencoekefkjkn
Data Binding Syntax
Data binding is accomplished by adding an HTML attribute called data-bind to any
HTML element that you want Knockout to replace with information from your
ViewModel.
Knockout bindings using HTML comments
<!-- ko -->
<!-- /ko -->
Binding through HTML comments is extremely convenient when you want to wrap
your binding around a block of HTML code, o
<h1>Hello <span data-bind="text: name"></span></h1>
A span tag is data-bound to the name property of the ViewModel. This is done by
placing text: name inside the data-bind HTML attribute.
implementing Knockout requires
three distinct things. The first is the view, which in this example is the HTML that
contains the h1 and span tags that
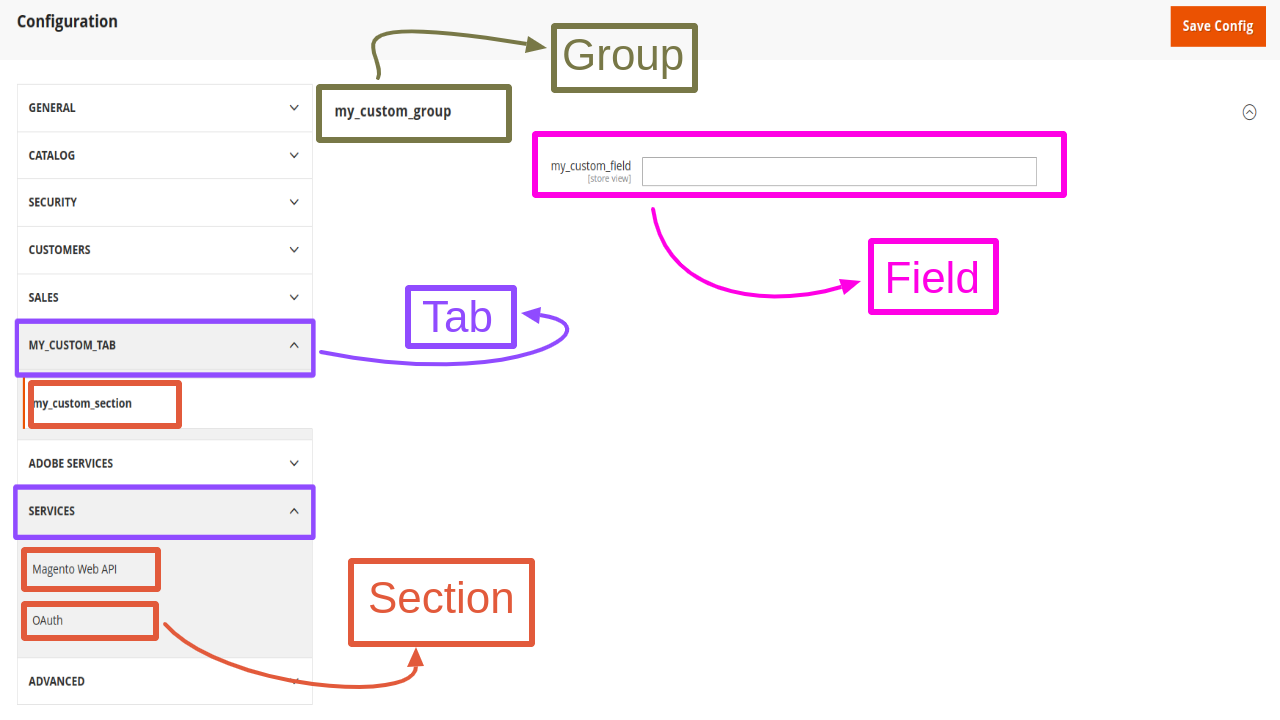
Create a file at etc/adminhtml/system.xml for that specific module.
In the system.xml
file, it is possible to define four different types of entities those are below
<?xml version="1.0" ?>
<config xmlns:xsi="http://www.w3.org/2001/XMLSchema-instance" xsi:noNamespaceSchemaLocation="urn:magento:module:Magento_Config:etc/system_file.xsd">
<system>
<tab id="A_UNIQUE_ID" translate="label" class="a-custom-css-class-to-style-this-tab" sortOrder="10">
<label>A meaningful label</label>
</tab>
</system>
</config>
Only id is required
<?xml version="1.0" ?>
<config xmlns:xsi="http://www.w3.org/2001/XMLSchema-instance" xsi:noNamespaceSchemaLocation="urn:magento:module:Magento_Config:etc/system_file.xsd">
<system>
<tab id="A_UNIQUE_ID" translate="label" class="a-custom-css-class-to-style-this-tab" sortOrder="10">
<label>A meaningful label</label>
</tab>
<section id="A_UNIQUE_SECTION_ID"
Main xml Layout of checkout is
checkout_cart_index.xml
We can copy it in theme to override and add changes into it.
Now you can also check from xml which js component is attatch to html.
Under web/template/minicart/item/default.html we have table which show product image, price, quantity and total on cart page.
Following file contain the action like Remove or edit for indivisual items.
\vendor\magento\module-checkout\view\frontend\layout\checkout_cart_item_renderers.xml
Don't forget to include the sequence in the module.xml file when creating a custom module for checkout.
<sequence>
<module name="Magento_Checkout"/>
</sequence>
Magento 2 checkout is different when compared to other components in Magento, such as the catalog. The checkout process heavily depends on Knockout.js and HTML. It involves complex interactions and real-time updates, making it essential to understand how these technologies work together.
First thing first.
Generate CSR from below link
Save the key and Private key securely.
A Certificate Signing Request (CSR) is a formatted message that an applicant for a Secure Sockets Layer (SSL) digital certificate sends to a certificate authority (CA). The CSR contains information that the CA uses to create the certificate, including the organization, country, and common name.
Get a free certificate
https://www.hostingwalay.pk/ssl-certificates.php
Certificate (CRT) will copied to CRT
PRIVATE KEY WILL go Pem keys
If admin is not opening either after migration or upgration or you have change the server then you have to check few things first.
select * from core_config_data where path like '%custom%';
This Command will give you all the option from db related to admin settings. Pay attention to these
From etc.env file you can check
return array ( 'backend' => array ( 'frontName' => 'admin', ),
Also check from db that ssl is enable for admin or not.
https://aureatelabs.com/blog/easiest-way-to-load-your-custom-js-component-in-magento-2/
https://r-martins.github.io/m1docs/videos/fundamentals/add-a-javascript-module/index.html
https://github.com/nans/Magestudy/tree/master?tab=readme-ov-file
There are 3 ways to add JS
1) Via Adding Layout
You can add JavaScript files to specific pages or all pages using layout XML files.
Layout XML:
<?xml
Now we have to create the styling file. All the css and js files must be created under view/{areacode}/web folder.
All configuration is done in the requirejs-config.js
file. It has a single root object config
which contains the configuration options described below.
var config = {
map: {...},
paths: {...},
deps: [...],
shim: {...},
config: {
mixins: {...},
text: {...}
}
}